Last year Golem Painting Studio ran a workshop in the run-up to the UK Golden Demon event. The gist of which was that you took along your current project (potentially your Golden Demon entry) and worked under the watchful eye of a handful of tutors to really make sure your model was the best it could be.
After the success of the event last year, and also the painting masterclass they ran earlier this year, Golem Painting Studio decided to make the Daemon Day a yearly event. It is now that time of year again and there are some really great tutors in the line-up...

Showing posts with label Painting. Show all posts
Showing posts with label Painting. Show all posts
Friday, 17 August 2012

Tuesday, 12 June 2012
Pretty awesome weekend
Wow, what a weekend... 650 miles on the clock, but most definitely worth it!
It all started on Friday when I started my long trek 'up country' to Mansfield. I decided to take a slight detour to my parents place and stayed there Friday night, which halved the driving I'd need to do on the Saturday morning (only 2 hours driving - yay!). And why was I heading to Mansfield from deepest darkest Devon?
Friday, 4 May 2012
Black backgrounds
As a whole, I tend to be pretty old school when it comes to photographing miniatures - lots of light, and a traditional blue-to-white gradient background. The gradient background seems to be pretty passée these days but I am always a little unsure about people's motivation for the way they photograph their miniatures.
For me, the intent is to give as realistic a photograph as possible with the limited photographic resources at my disposal. I want it to look as much like the model in hand as I can get it, so I try to get a good amount of light on anything I photograph from a number of different angles in an attempt to banish any shadows and let the painting do the work ie, the shadows you can see 'should' be those painted in by me. This is not an easy task, and I don't often manage it 100%, but I do try my best.
For some people (and this isn't about anybody specific, just a general trend I have observed) it almost seems that the photograph has become a piece of art of its own accord - strong/directional lighting, black/photoshopped background. They get a lot of atmosphere into their models, but I am never quite sure they are entirely accurate reproductions of the actual miniature.
For me, the intent is to give as realistic a photograph as possible with the limited photographic resources at my disposal. I want it to look as much like the model in hand as I can get it, so I try to get a good amount of light on anything I photograph from a number of different angles in an attempt to banish any shadows and let the painting do the work ie, the shadows you can see 'should' be those painted in by me. This is not an easy task, and I don't often manage it 100%, but I do try my best.
For some people (and this isn't about anybody specific, just a general trend I have observed) it almost seems that the photograph has become a piece of art of its own accord - strong/directional lighting, black/photoshopped background. They get a lot of atmosphere into their models, but I am never quite sure they are entirely accurate reproductions of the actual miniature.
Thursday, 2 February 2012
Strain Revenant - flesh done!
Blimey.... February already??
Flesh is done! Made a bit of a faux pas with the trouser colour, but that can be changed... I am thinking of making it blue and yellow like the first revenant I painted. The grey here seems too desaturated for the rest of the model throwing it out of balance. It almost makes it look like I just haven't painted the trousers at all...

Flesh is done! Made a bit of a faux pas with the trouser colour, but that can be changed... I am thinking of making it blue and yellow like the first revenant I painted. The grey here seems too desaturated for the rest of the model throwing it out of balance. It almost makes it look like I just haven't painted the trousers at all...

Tuesday, 18 October 2011
More WIPS - painting one bust and sculpting another!
So, next up are a couple more WIPs - the Avelonian bust is heading rapidly to completion (although I keep looking at it wanting to add some kind of freehand), and a Pirate Orc Bust a 'Jolly Bodger' so to speak...
The Avelonian:




The Avelonian:


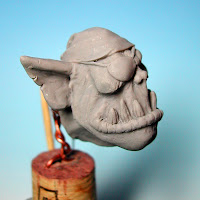
The Pirate Orc has been sculpted in my usual 50:50 mix of Super Sculpey firm and regular and has a ball-bearing eye. I used a different technique to stop the sculpey from separating from the armature this time though, and it made a massive difference - I added a procreate core to the armature and before it had cured I started adding the bulk of the sculpey. Then I left it to dry before continuing the sculpt.
This is it now, after the first bake (as you can see, thos one is more GW in style than the last Bonner-esque one):


Sunday, 21 August 2011
Domaru Butai = Bananaman in Japanese?
Konichiwa! A week since my last post and my Domaru Butai now has some colour.
I have gone for a yellow and blue scheme on him (I changed my mind from the red and white I mentioned a few posts ago - he's gone from the Marlboro Man to Bananaman...) and am pretty chuffed with how he is turning out so far. Lots and lots of layers, to gradually build up the colour, but it seems to be working. Yellow is usually a bit of a bane of mine (I suspect thats one of the reasons I chose it - just to torture myself) so I thought I'd mention a few of the colours I used in more detail.

I have tried to use a little colour theory here and had a go at shading with a contrasting colour. In this instance, the opposite to yellow on my colour chart is purple, so I started off my base coating most of the armour in GW Foundation Iyanden Darkson, and then added progressively more Vallejo Model Colour (VMC) Purple to the mix. Each stage I would layer on a few more layers getting deeper into the recesses.

Once I got to pure purple, I started working with Reaper Master Series (RMS) Redstone Shadow and applied a number of glazes deep into the shadows. Adding the very dark orange into the deepest shadows here takes me back towards yellow again but should also give me a nice contrast with the dark blue I will be using elsewhere.
At some point I blocked in some dark blue, just to see how it was looking. This was mainly curiosity, but it also meant that some of the dark colour was already in place so when I come back to it there is less likelihood of me daubing dark blue paint over a lovingly shaded and highlighted yellow suit of armour...!
I then highlighted by adding VMC Light Yellow to the Iyandon Darkson and gradually built up some highlights on the upper edges of the model. Both the shading and the highlighting was done with a zenithal method in mind with a diffuse overhead light source. The last thing I did was glaze a super-thin wash of the VERY old GW yellow ink over all of the armour. This brought all the colours together and smoothed out any rough highlighting. I do intent to re-highlight in Light Yellow and also apply some spot white highlights to some sharp edges to really make it 'pop'.
Here are some more photos:


I have gone for a yellow and blue scheme on him (I changed my mind from the red and white I mentioned a few posts ago - he's gone from the Marlboro Man to Bananaman...) and am pretty chuffed with how he is turning out so far. Lots and lots of layers, to gradually build up the colour, but it seems to be working. Yellow is usually a bit of a bane of mine (I suspect thats one of the reasons I chose it - just to torture myself) so I thought I'd mention a few of the colours I used in more detail.

I have tried to use a little colour theory here and had a go at shading with a contrasting colour. In this instance, the opposite to yellow on my colour chart is purple, so I started off my base coating most of the armour in GW Foundation Iyanden Darkson, and then added progressively more Vallejo Model Colour (VMC) Purple to the mix. Each stage I would layer on a few more layers getting deeper into the recesses.

Once I got to pure purple, I started working with Reaper Master Series (RMS) Redstone Shadow and applied a number of glazes deep into the shadows. Adding the very dark orange into the deepest shadows here takes me back towards yellow again but should also give me a nice contrast with the dark blue I will be using elsewhere.
At some point I blocked in some dark blue, just to see how it was looking. This was mainly curiosity, but it also meant that some of the dark colour was already in place so when I come back to it there is less likelihood of me daubing dark blue paint over a lovingly shaded and highlighted yellow suit of armour...!
I then highlighted by adding VMC Light Yellow to the Iyandon Darkson and gradually built up some highlights on the upper edges of the model. Both the shading and the highlighting was done with a zenithal method in mind with a diffuse overhead light source. The last thing I did was glaze a super-thin wash of the VERY old GW yellow ink over all of the armour. This brought all the colours together and smoothed out any rough highlighting. I do intent to re-highlight in Light Yellow and also apply some spot white highlights to some sharp edges to really make it 'pop'.
Here are some more photos:


Monday, 8 August 2011
Next!
And now for something completely different... my first Infinity model!
I am trying to do a really high-scifi base with the typical Infinity staples of engraved panel lines and hexagons. The back of the piece will also have a detailed outer section. I am thinking of going quite wacky with my colours on this guy and do a Marlboro style red and white colour scheme - basically a white triangle on a red background over the whole model rather than picking out specific panels which appears to be the traditional way.


If the experience of painting this guy goes well, I am thinking of doing a small Infinity warband...
I am trying to do a really high-scifi base with the typical Infinity staples of engraved panel lines and hexagons. The back of the piece will also have a detailed outer section. I am thinking of going quite wacky with my colours on this guy and do a Marlboro style red and white colour scheme - basically a white triangle on a red background over the whole model rather than picking out specific panels which appears to be the traditional way.


If the experience of painting this guy goes well, I am thinking of doing a small Infinity warband...
Wednesday, 3 August 2011
Vadim one last time
Actually, scrap that last post, I have fiddled a bit with him and tried to get some better photos.
Gave him a wolf's head tattoo and a crude but very subtle (less so in real life) wolf design on the metal scales on his back.
Gave him a wolf's head tattoo and a crude but very subtle (less so in real life) wolf design on the metal scales on his back.
Saturday, 30 July 2011
Quick Orc update
Got a bit more done on the orc this week... he is getting close to completion now, but he needs some kind of fine detail. I am thinking of tattoos or warpaint, but I cant decide which!
On to the pics:

On to the pics:

Sunday, 24 July 2011
The WAMP Orc
As I mentioned in my previous post, I did some work on the Orc I am hoping to enter into the WAMP competition. He's looking a little rough atm, but he's getting there slowly...
I had a bit of a crisis once I started painting the metallics. His flesh was too light for the dark, worn metals I had gone for (a blackened steel and bronze) so I have tried to deepen the tone of the flesh, but keeping it fairly desaturated and not loose the brightness of the highlights.
Took a lot of faffing, but here are some pics:

I had a bit of a crisis once I started painting the metallics. His flesh was too light for the dark, worn metals I had gone for (a blackened steel and bronze) so I have tried to deepen the tone of the flesh, but keeping it fairly desaturated and not loose the brightness of the highlights.
Took a lot of faffing, but here are some pics:

Monday, 18 July 2011
Zenithal priming?
I dont know if this will come across so well in these photos, but here are pics of my orc after the zenithal priming.
You can just about see the transitions from grey to white where I have blasted white down from an angle


You can just about see the transitions from grey to white where I have blasted white down from an angle


Sunday, 17 July 2011
Straight on to the next project...
Well, I have been thinking about the model I want to do for the WAMP Hasslefree competition, and I have come to the conclusion that what I really want to do is something fantasy (after my recent sci-fi endeavour). With it being HF, you're pretty well spoilt for choice but I have had my eye on one of their earlier models for quite some time. It is Vadim the orc

He is now prepped, attached to the base and primed. I have gone for a 'zenithal priming' technique for the first time where I have primed grey and then primed white from about a 60 degree angle all round the model. This should give me a good idea for positioning of shadows and highlights but also allow the high spots to be naturally brighter as they have a white undercoat.
I am thinking 'real metallics', lots of leather and dark, oily metals... but only time will tell!

He is now prepped, attached to the base and primed. I have gone for a 'zenithal priming' technique for the first time where I have primed grey and then primed white from about a 60 degree angle all round the model. This should give me a good idea for positioning of shadows and highlights but also allow the high spots to be naturally brighter as they have a white undercoat.
I am thinking 'real metallics', lots of leather and dark, oily metals... but only time will tell!
Wednesday, 13 July 2011
The Ultramarine Veteran - Complete
Well, I think he's complete...!
He has been a lot of fun to paint, and I like what I have achieved in the relatively short time its taken me (snatched moments build up in the end!). He's the first Space Marine I've painted in a long while, but I don't think he is going to be my last*.
One thing that I am not so sure of is the open space at the back. Now it is painted it feels a lot larger an expanse than when I was building it... I am tempted to add a discarded bolter and some shell casings to that side, but can't decide if its needed...
EDIT: I have now uploaded these pics to CoolMiniOrNot! If you fancy popping over and voting for this guy, you can find him here: http://www.coolminiornot.com/283094
He has been a lot of fun to paint, and I like what I have achieved in the relatively short time its taken me (snatched moments build up in the end!). He's the first Space Marine I've painted in a long while, but I don't think he is going to be my last*.
One thing that I am not so sure of is the open space at the back. Now it is painted it feels a lot larger an expanse than when I was building it... I am tempted to add a discarded bolter and some shell casings to that side, but can't decide if its needed...
EDIT: I have now uploaded these pics to CoolMiniOrNot! If you fancy popping over and voting for this guy, you can find him here: http://www.coolminiornot.com/283094
Monday, 11 July 2011
Amazing Duel
I love a good Duel entry at Golden Demons - its probably my favourite category. I love it even more when people think outside the box... and I don't mean cramming the largest rock possible on top of the 50mm base and slapping a huge monster on there.
Here is an example of something which really floats my boat - a TINY duel by Morbäck:

Everything you need in a tight little diorama - action, movement, direct interaction and great composition all on a base the size of a Euro coin. The painting speaks for itself!
Wednesday, 6 July 2011
Ultramarine progress
Bit more progress on the Ultramarine tonight, got a good lot of paint slapped onto the base and the backpack is on. Lots of weathering to be done on the groundwork yet, and some finer details on the marine himself, but he's getting there.
It is meant to be an alien yet familiar terrain with red mars-esque sand and alien green crystals sticking out of the earth.

It is meant to be an alien yet familiar terrain with red mars-esque sand and alien green crystals sticking out of the earth.

Embarrassing photos, glorious moment
Well, Salute 2011 was a pretty amazing day for me, which resulted in me having to pop up on stage in front of everyone and receive some prizes. Unfortunately as embarassing as that is, its the photos that really make me cringe.
here goes....
here goes....
Speed painting
I'm rubbish at it...
But today I came across an interesting tutorial by Eric Louchard on the Reaper forums (thanks to my mate Gi6ers), and I think it makes a really interesting way of painting so I wanted to share.
http://www.reapermini.com/forum/index.php?/topic/42789-figures-from-the-stone-age/
I think this would be a very good way of painting some of my (well, Tracy's) older Grenadier orcs... might have to give it a go at some point - hack and slash my way through some of my lead mountain!
But today I came across an interesting tutorial by Eric Louchard on the Reaper forums (thanks to my mate Gi6ers), and I think it makes a really interesting way of painting so I wanted to share.
http://www.reapermini.com/forum/index.php?/topic/42789-figures-from-the-stone-age/
I think this would be a very good way of painting some of my (well, Tracy's) older Grenadier orcs... might have to give it a go at some point - hack and slash my way through some of my lead mountain!
Tuesday, 5 July 2011
The next step
Well, the base is pretty much built and and after a bit of filling and sanding, I have attached it to the plinth and sprayed it all black.


Thursday, 30 June 2011
New pics of my Ultramarine
Got some better photos of the Marine - turned all the camera settings back to Automatic, switched on Macro mode and 2 second delay, and as they say, "Robert's ya Mother's Brother"! Not perfect, but they'll do


Wednesday, 29 June 2011
And while I'm at it....
There are often threads on forums asking people to post their workspace... well, here's ours!


Subscribe to:
Posts (Atom)